Expona
Context-trained AI agent delivering noise-free, cost-efficient conversational intelligence


 expona
If you are using Salesforce and are in need to store large sets of data, you may want to consider Amazon’s cost-effective storage as an alternative. Amazon provides access to its broad spectrum of AWS services by leveraging different versions of a signature such as version 1, version 2 and version 4.
Moving away from the bookish definitions, a signature is simply a computed alpha numeric value of a certain length that acts as a mechanism to verify the identity of the requester and protect the data in transit, in a service based communication model.
Amazon Signature version 4 is the protocol for authenticating inbound API requests to Amazon Web Services. It is considerably more secured than its version 2 variant and is supported in all geographical regions. In fact, any new regions after January 30, 2014 will only support Signature Version 4. In this two-post series, I will elucidate how to integrate Amazon with Salesforce by generating a signed request using Signature Version 4. While the first part would primarily deal with the creation of a canonical request, the second post will detail the calculation of a signature and creation of a signed request and conclude the integration process.
To sign a request using signature version 4, we need to calculate a signature that’s based on a combination of information in the request (For example, AWS service, region, action, time stamp, mode, access key and secret key). After calculating the signature, we need to add it to the request as a parameter, either in the header of the request or as a query-string parameter. Integrating Amazon to Salesforce using Signature Version 4 is essentially a 2-step process:
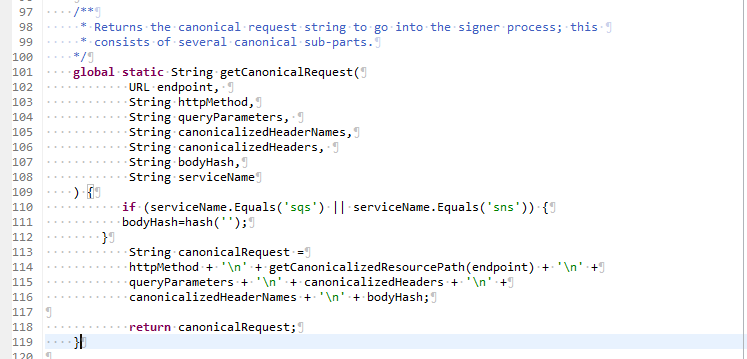
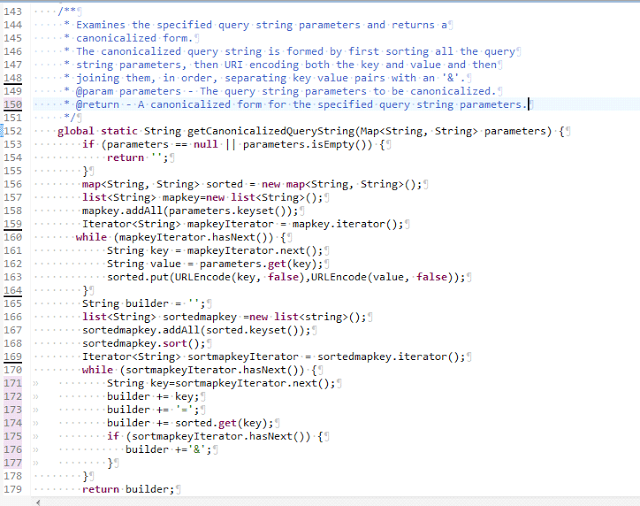
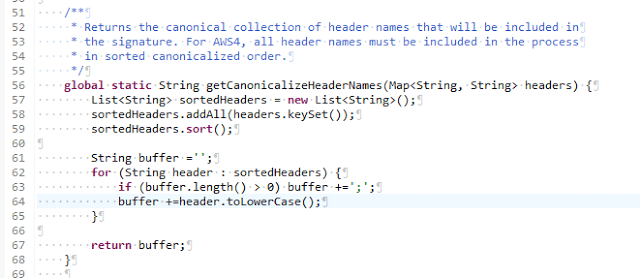
The first step for calculating a Signature is to create a Canonical request. You need to arrange the content of your request into a standard canonical form and then create a Hash (digest) of the canonical request, add it to the canonical request and then create a digest of the updated canonical request. This is illustrated in the code snippet given below.
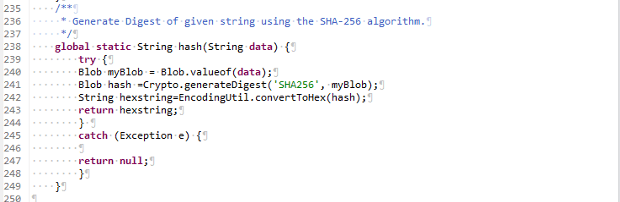
Once you have completed all these steps, your canonical request will look like:
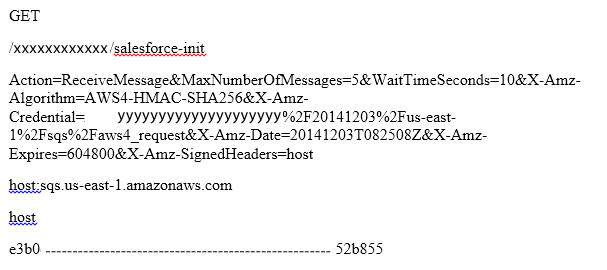
In my next post, I will take you through the process of creation of a string to sign, and the process to calculate the signature and finally, the creation of a signed request. So be ready with your canonical request!

Context-trained AI agent delivering noise-free, cost-efficient conversational intelligence

We offer functional, technical, and implementation support, minimizing disruptions to your operations.

AI or Gen AI, consulting, development or model building. You ask for any of them. We will deliver.
Insights from our team of experts who deliver digital software day in and day out.
 Thank you for signing up!
Thanks a lot for your interest. You are already a subscriber. You will receive your first newsletter soon.